Self-Hosting with a Spare Computer and Custom Domains — Beyond the Cloud
Hey there!
Welcome (back)! This article focuses on Infrastructure for Makers, Low-Cost Startups and Testing Environments and Prototypes. It provides a walkthrough for setting up a Home-Grade Reverse Proxy Server using a spare computer such as a Raspberry Pi or a Mac Mini. It leverages Cloudflare as a DNS manager to map any domain name to your machine’s IPv4 or IPv6 address while proxying the IP to prevent certain types of attacks by hiding your IP. I’ll share the necessary code to run your home proxy server with Node.js and an example of a simple website served directly from your home server. You can find the public repository with the code right here. The project is fully testable on a laptop too; I just recommend running it on a headless machine if you plan to host for a longer time.
In fact this is how I host https://sooft.studio and https://ndr3svt.art. And how I am also hosting for deskflot, medvilla and soil.d.
Disclaimer: this is NOT A LOW-CODE NOR A NO-CODE solution. In fact it is a “I want to code” and “I want to be in control of my resources, costs and infrastructure” solution.
What Will You Find in the Repository and What Is It Useful For?
This public repository provides a practical methodology for self-hosting a custom domain using a low-cost home infrastructure. It demonstrates how to leverage Cloudflare and IPv6 to proxy traffic between your domain’s DNS and the IPv6 address of your home machine. By utilizing Cloudflare’s proxying capabilities, your setup gains an additional layer of security by hiding your IP and mitigating potential threats.
The repository includes a fully functional example of a Node.js reverse proxy server. This example shows how to host multiple domains on the same server by routing traffic dynamically based on URL patterns to locally hosted Node.js applications. It is a flexible solution that allows you to manage different web services or projects from a single machine efficiently.
This approach offers a compact, scalable, and cost-effective solution for hosting a wide variety of applications, such as:
- Simple websites and landing pages
- Web applications
- APIs and backend services
- WebSocket managers
- Database servers
- Prototyping and testing environments
Additionally, the methodology is designed to be testable on laptops, making it accessible for experimentation and development. For longer-term hosting, it is recommended to use a headless machine like a Raspberry Pi, Mac Mini, or any other energy-efficient computer.
This repository is ideal for makers, startups, and developers who need an affordable yet powerful hosting solution for small-scale projects, prototypes, or even production-ready applications. This solution is ideal for building and testing your products at minimal cost, while also enabling you to serve them to real users and customers. It provides a practical way to validate your business idea before committing to scaling it further.
Requirements
- You’ll need a domain, which you can purchase from any domain registrar. In this example, we use a domain registered through Namecheap.
- You’ll also need a spare machine, preferably a headless one to minimize energy consumption. This could be a Raspberry Pi, Mac Mini, or a similar device. Ideally, the machine should run Linux or Unix for smoother installation of npm, Node.js modules, and IPv6-related protocols.
- Lastly, you’ll need a free Cloudflare account and a stable internet connection. The faster the connection, the better the performance.
- Ah, and I forgot, you’ll also need an Internet Router capable of handling IPV6 protocole or Port Forwarding to be used with IPV4 protocole
With these requirements covered, you’ll be ready to set up your self-hosting infrastructure!
Let’s get Hands-On
Next, we’ll guide you through a step-by-step process to set up all the required components, ensuring seamless traffic proxying between any web browser worldwide and your domain. Behind the scenes, Cloudflare will function as a proxy, rerouting HTTP requests from browsers trying to access your domain’s URL.
1. Setting Up Cloudflare and Your Domain Name
Quick Steps to Set Up Your Domain in Cloudflare:
Create a New Domain Project in Cloudflare:
Log in to the Cloudflare dashboard and add a new domain to your account.
Follow Automatic Recognition:
Cloudflare will automatically detect and import your domain’s existing DNS records. Review and confirm these settings to proceed.
Update Your Domain Provider’s Nameservers:
Replace the nameservers in your domain provider’s settings with the ones provided by Cloudflare. This links your domain to your Cloudflare project.
Configure SSL/TLS Encryption:
- Go to the SSL/TLS section in the Cloudflare dashboard.
- Set the encryption mode to Full Strict.
- This will enable secure, encrypted HTTPS traffic between browsers and your domain.
Generate and Download Certificates:
- Navigate to SSL/TLS > Origin Server in Cloudflare.
- Create and download the Origin Certificate. Save these certificates securely, as they will be required later to configure your server.
Following these steps will ensure that your domain is securely set up and ready to handle HTTPS traffic. Now let’s go through the steps in detail.
Create a New Domain Project in Cloudflare
The first thing we are going to do is map Cloudflare’s Name Server to your Domain’s Name Server. To do this, you’ll need to create a Cloudflare account and log in.
Once logged in, navigate to the main dashboard, where you’ll see an interface similar to the following screenshot:
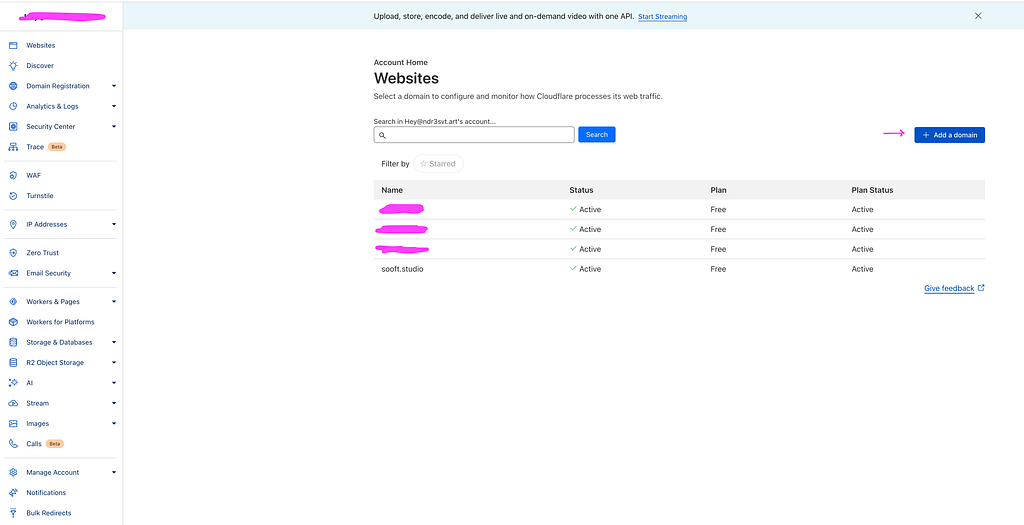
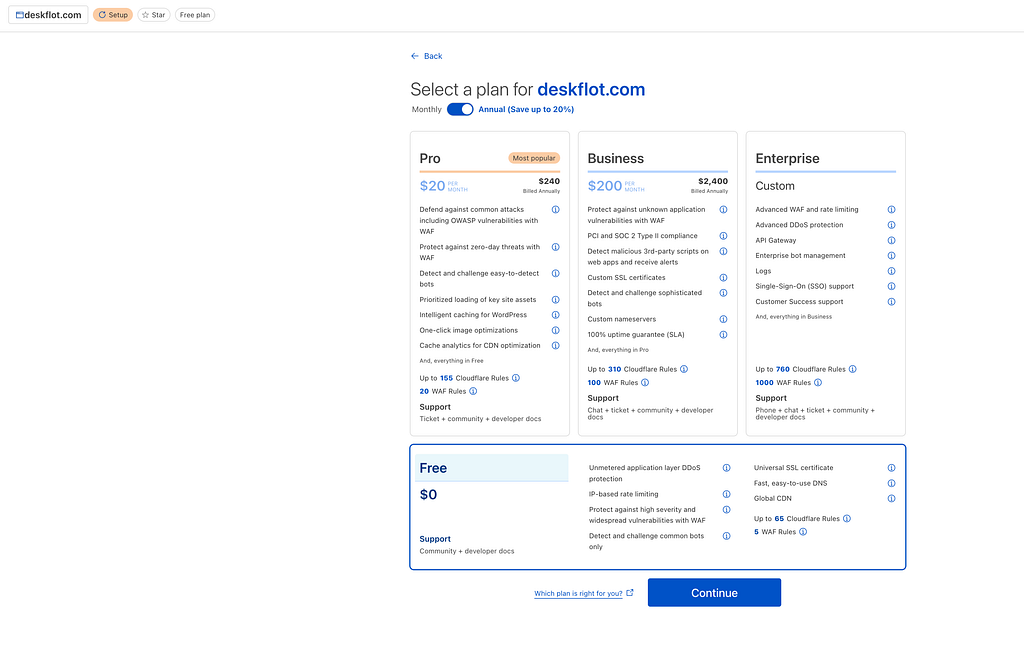
Click on the “+Add a Domain” button and enter the domain name you previously acquired from your domain provider. In this example, we’ll use a domain I own for a project I’m building called deskflot.com. After entering your domain name, click “Continue” and select the Free plan to proceed.
Cloudflare will automatically detect the DNS records associated with your domain. If you’re unfamiliar with DNS records, don’t worry — we’ll cover them in detail in later steps.
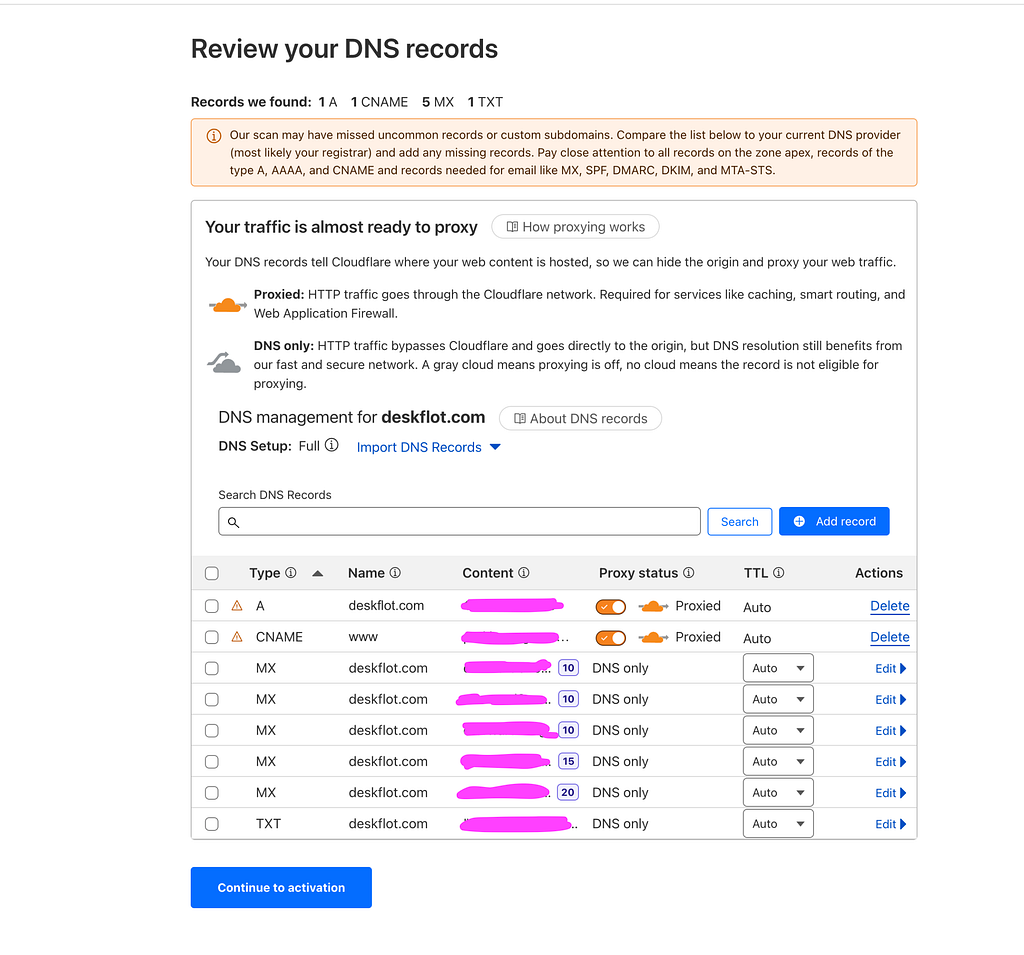
Click on ‘Continue to Activation’, and Cloudflare will direct you to a page displaying your nameservers. These nameservers are all you need to map Cloudflare to your domain.
It’s important to note that you should not disclose these nameservers. They typically consist of two entries and, along with associated IP addresses in IPv4 and IPv6 protocols, should be treated as sensitive information. Exposing this information could make your system a target for hackers and malicious software. Always keep these details secure.
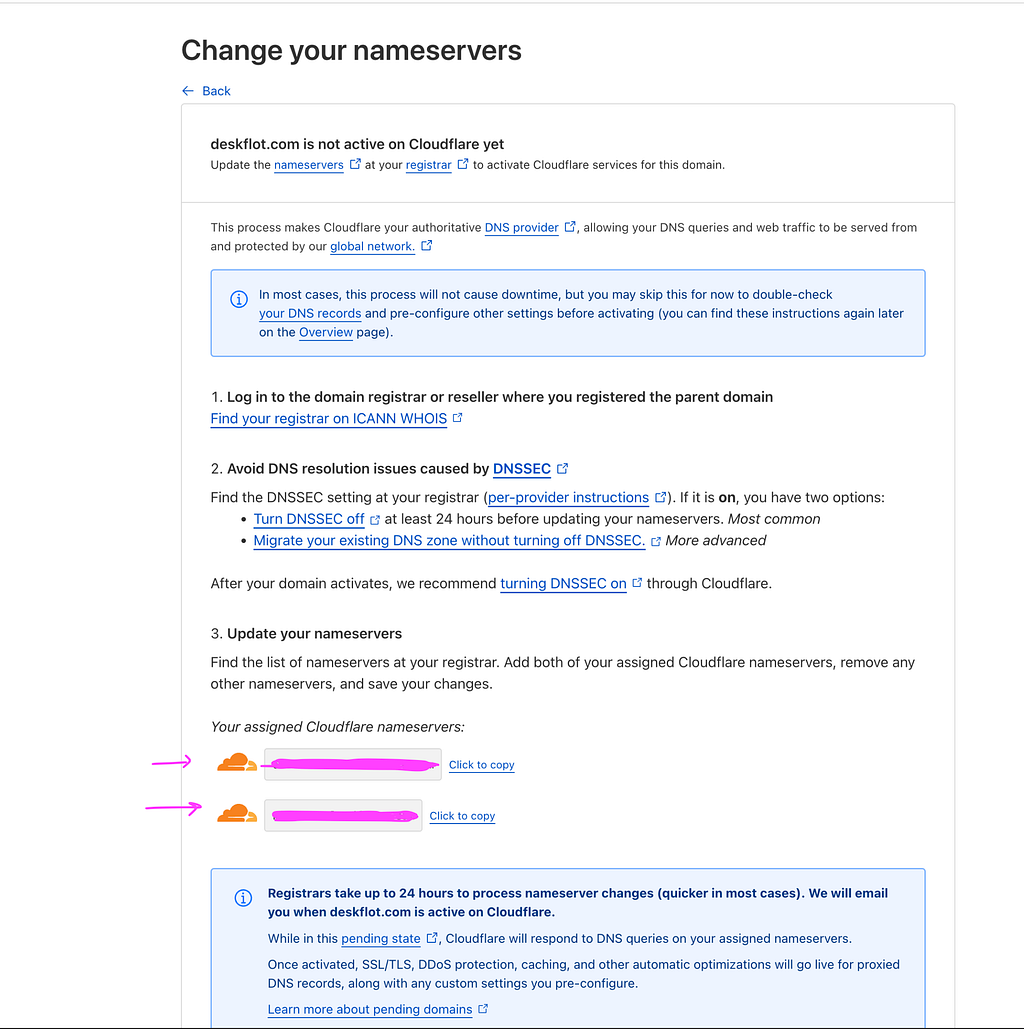
Update Your Domain Provider’s Nameservers
Now, we will copy these nameservers and switch to our Domain Provider Dashboard to replace the existing nameservers for our target domain. Here are the steps for doing this in Namecheap:
- Log in: Access your Namecheap (or other domain provider) account and navigate to your administration dashboard.
- Domain List: Locate your Domain List and find your desired domain. In this example, we’ll use deskflot.com.
- Manage Settings: Click on Manage or Settings for your domain. Locate Nameservers: Look for a section called Nameservers in the domain settings.
- Edit Nameservers: Update the existing nameservers to match the ones provided by Cloudflare during the activation of your domain.
After making these changes, save the updated nameservers and allow some time for the changes to propagate.

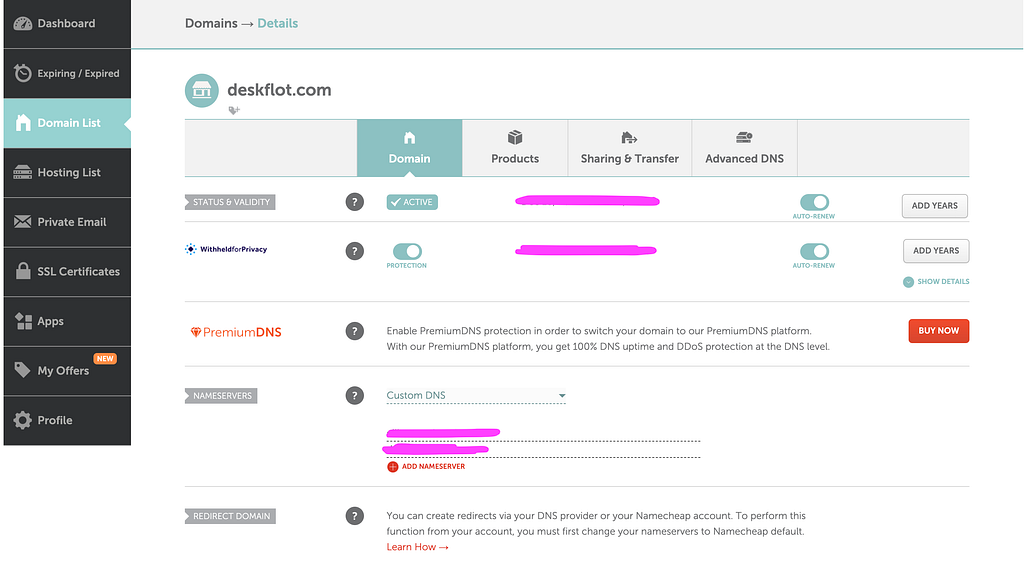
Great! With these steps, we’re done with the domain provider setup. Now, let’s switch back to Cloudflare and configure the SSL/TLS encryption, which will enable us to use the secure HTTPS traffic protocol.
Configure SSL/TLS Encryption
Cloudflare not only proxies traffic but also enables SSL/TLS encryption, which is a standard requirement for any serious and modern website or web application. SSL/TLS encryption ensures that data transmitted between the client and server (or between nodes) is secure. Even if data packets are intercepted or spoofed, the encryption makes them unreadable, safeguarding sensitive information.
What is a proxy server?
> A proxy server is a system or router that provides a gateway between users and the internet. Therefore, it helps prevent cyber attackers from entering a private network. It is a server, referred to as an “intermediary” because it goes between end-users and the web pages they visit online. https://www.fortinet.com/resources/cyberglossary/proxy-server#:~:text=A%20proxy%20server%20is%20a,web%20pages%20they%20visit%20online.
We will use a simple method: generating an Origin Certificate and its key via Cloudflare and setting SSL/TLS encryption to Full (strict) mode.
- Navigate to Cloudflare’s Dashboard: Log in to Cloudflare, click on your target domain, and find the SSL/TLS option in the left-hand menu.
- Access SSL/TLS Settings: Click on SSL/TLS, which will display additional options and open a view showing the overview and configuration section.
- Set Encryption Mode: In the SSL/TLS settings, set the encryption mode to Full (strict).
- No Further Changes Needed: Once this option is set, you don’t need to change anything else in this section.
This setup ensures a secure and encrypted connection between Cloudflare and your origin server.
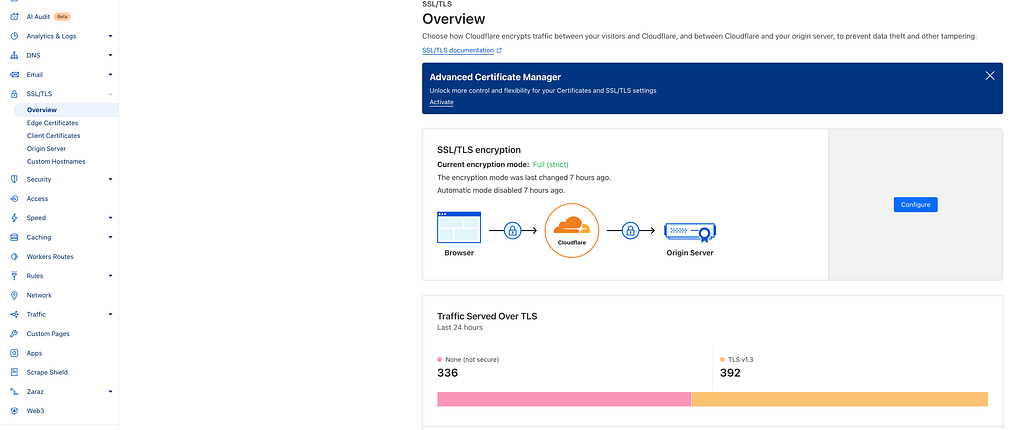
Now let’s configure Cloudflare to always use HTTPS. This will reroute all HTTP requests to HTTPS.
- Go to Edge Certificates
- Scroll Down to find the Option Always Use HTTPS
- Turn the Toggle Button on
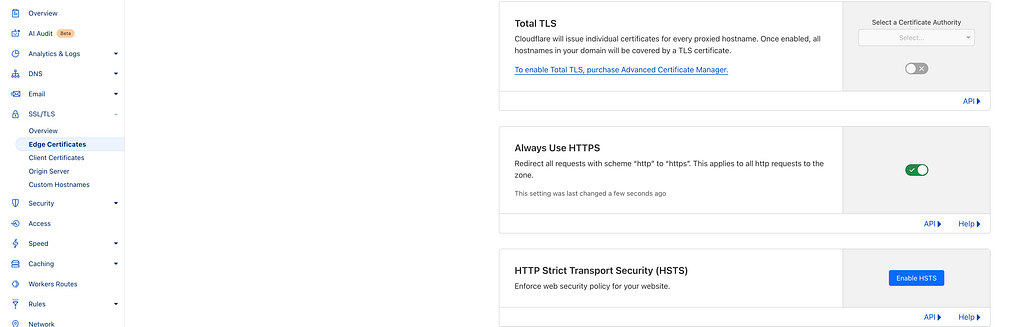
Generate and Download Origin Certificates
Now, click on Origin Server in the SSL/TLS menu. This will open a new view displaying a button labeled Create Certificate. Click on it to proceed with generating the necessary certificate.
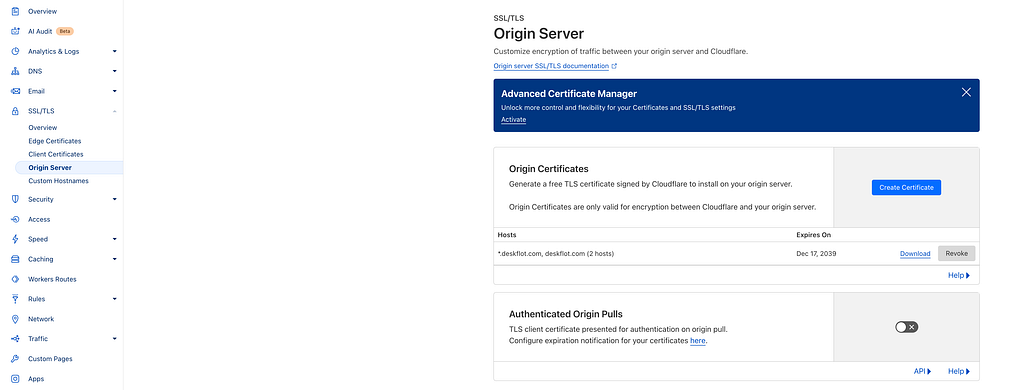
Click on the Create Certificate button and leave all the default options unchanged. Verify that the selected options match the ones shown in the image below. Once confirmed, click Create to generate your certificate.
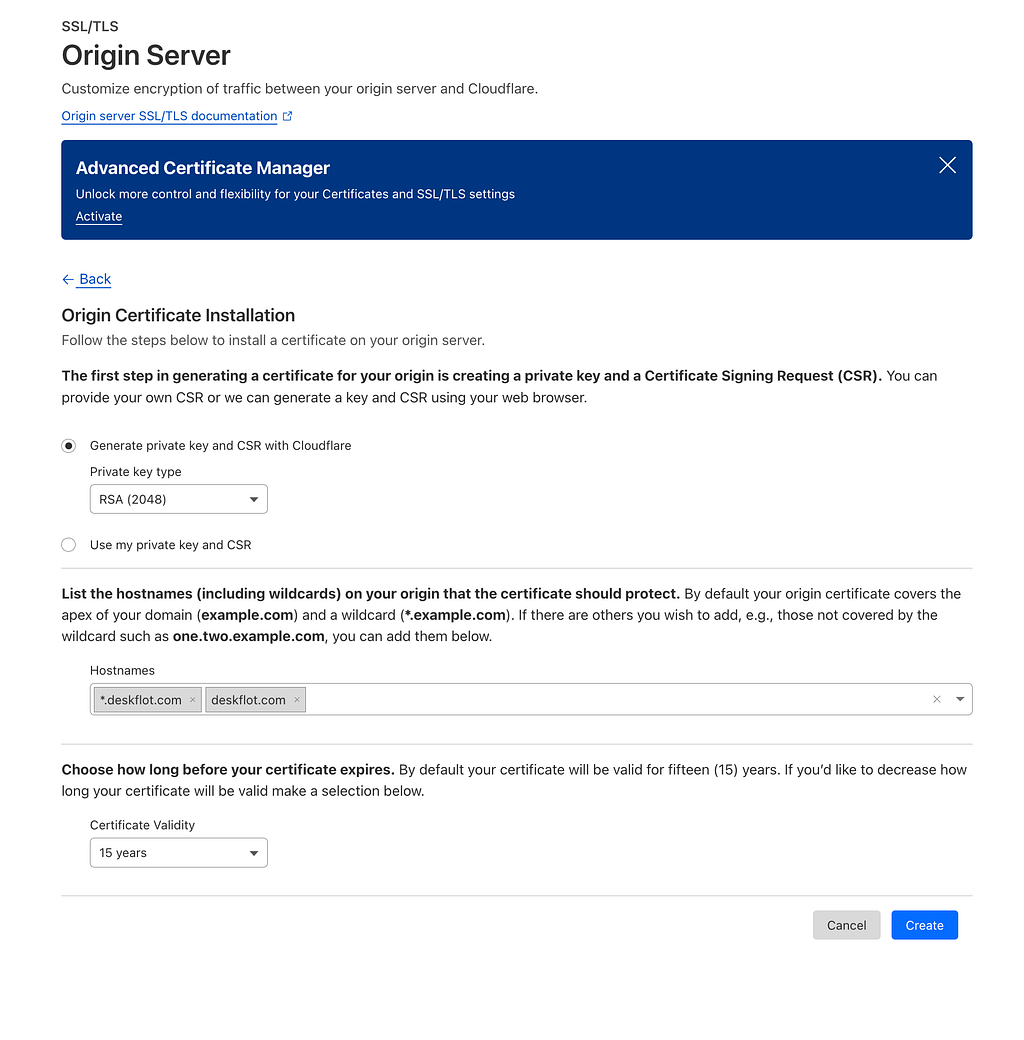
Upon creation, Cloudflare will display both the Key and the Certificate. Please copy each of these into separate text files and store them as follows, without changing any characters or spaces inside the files:
- Origin Certificate: Save this as certificate_yourdomaincom.pem.
- Private Key: Save this as privatekey_yourdomaincom.pem.
Ensure the filenames reflect your actual domain name. For example, if your domain is example.com, the files should be named certificate_examplecom.pem and privatekey_examplecom.pem.
Double-check that the strings in the files match exactly what Cloudflare provided before closing the window. This is critical for proper configuration.
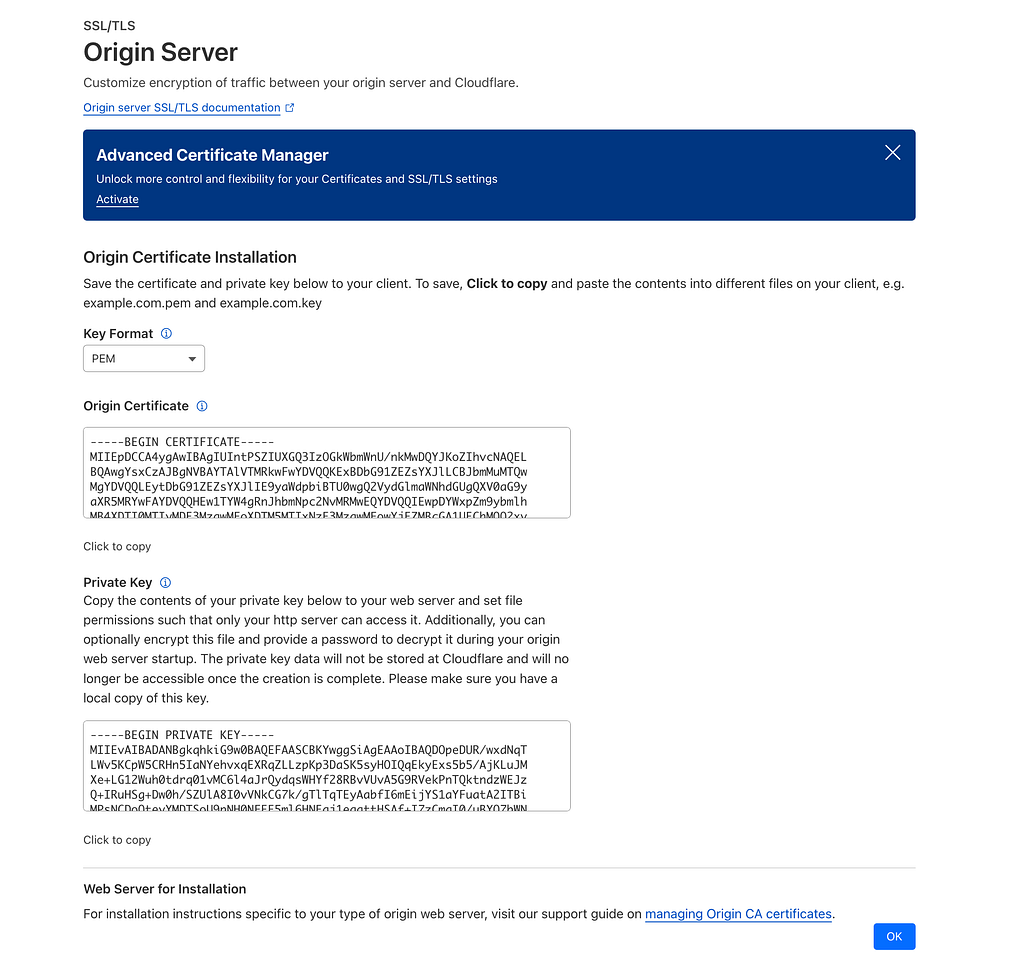
Don’t worry — these specific keys in the image above are not being used on deskflot.com. One of the advantages of certificates is that they can always be revoked and regenerated if needed, providing flexibility and security.
Alright, that’s it! Cloudflare SSL/TLS is now enabled.
We have one last step to prepare Cloudflare to forward traffic between your machine and the browser making HTTPS requests: setting up the DNS Records. To do this, we first need the IPv6 or IPv4 address of your machine.
Next, we’ll move on to setting up your machine to retrieve this information. Let’s proceed!
2. Set Up the Server with Your Raspberry Pi or Mac Mini
For Raspberry Pi:
- Follow the configuration steps from the official Raspberry Pi documentation: Raspberry Pi Getting Started.
- Install Git, Node.js, and npm on the Raspberry Pi.
For Mac Mini:
Mac Minis typically come pre-installed with macOS, so you only need to install:
- Git: If not already installed.
- Node.js and npm: You can download them from Node.js.
Setting Up the Server Code:
- Clone the Server Repository: Pull or clone the latest server code from the provided GitHub repository using the command: git clone <repository_url>
- Open the project in a code editor such as Visual Studio Code, Sublime Text, or any editor of your preference.
- Install Dependencies: Navigate to the root folder of the project in your terminal and run: npm install this will install all the necessary dependencies from your server.js and your nested public_selfhosted_domain.
- Set Up SSL and HTTPS:
- Locate the Origin Certificate and Private Key files generated earlier.
- Create a folder at the root of the project, e.g., certs, and store these files inside it.
5. Update the .env File:
- Rename env.example to .env.
- Open the .env file in your editor and update the CERT_PATH parameter if necessary: CERT_PATH='./certs'
6. Edit the Server Configuration: Open the server.js file and make the following changes:
- Update Certificate and Key Names (starting at line 34): Replace deskflotcom with your domain name. Example:
`` const options = { SNICallback: function (servername, cb) { customLog(Server name from SNI: ${servername}); if (servername.includes('yourdomain.com')) { cb(null, tls.createSecureContext({ key: fs.readFileSync(${certPath}privatekey_yourdomaincom.pem), cert: fs.readFileSync(${certPath}certificate_yourdomaincom.pem), minVersion: 'TLSv1.2' })); } else if (servername.includes('yourdomain.cc')) { cb(null, tls.createSecureContext({ key: fs.readFileSync(${certPath}privatekey_yourdomaincc.pem), cert: fs.readFileSync(${certPath}certificate_yourdomaincc.pem), minVersion: 'TLSv1.2' })); } else { cb(new Error('No suitable certificate.')); } } }; ``
- Update Domain URL Patterns (line 67): Replace deskflot.com with your domain name. You can also add more domain patterns if needed:
`` if (req.headers.host.includes('yourdomain.com')) { proxy.web(req, res, { target: 'http://localhost:3000' }); } else if(req.headers.host.includes('yourdomain.cc')) { proxy.web(req, res, { target: 'http://localhost:4000' }); } ``
Extend Domain Logic for Additional Domains
If you plan to handle additional domains, you can extend the logic further by adding more patterns in the SNICallback and the request handling logic. Example():
`` if (req.headers.host.includes('yourdomain.com')) { proxy.web(req, res, { target: 'http://localhost:3000' }); } else if(req.headers.host.includes('yourdomain.cc')) { proxy.web(req, res, { target: 'http://localhost:4000' }); } else if('third_domain.cc'){ proxy.web(req, res, { target: 'http://localhost:5000' }); } ``
Note that locally each new served domain requires an app broadcasting to a new port in the localhost — port 3000, port 4000, port 5000, etc. You can extend this by copying the public_selfhosted_domain folder and relabelling it to something like public_selfhosted_domain2. Then inside each new public app open the public_selfhosted_domain/app.js script and modify the port in the app.js accordingly.
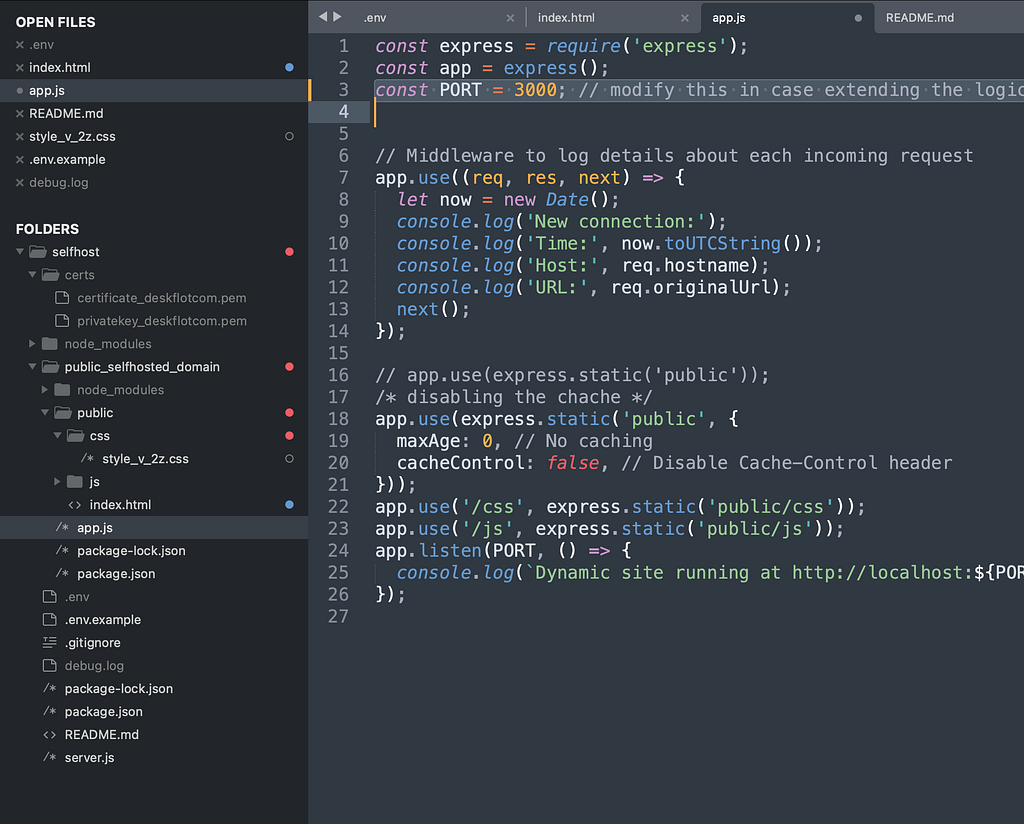
Also note that for this you will need to include the new app in the workspaces inside the package.json from the root folder:
`` { "name": "selfhost", "version": "1.0.0", "private": true, "workspaces": [ "public_selfhosted_domain", "public_selfhosted_doman2", "ps_d_3", "another_app", "etcetera" ], "dependencies": { "dotenv": "^16.4.7", "finalhandler": "^1.2.0", "http-proxy": "^1.18.1", "http2-proxy": "^5.0.53", "http2-wrapper": "^2.2.0", "ipware": "^2.0.0", "node-fetch": "^2.6.11" } } ``
Almost Ready!
Now, the final step is setting up traffic forwarding using your machine’s IPv6 or IPv4 address. Let’s move on to this crucial configuration!
3. Configure IP Forwarding Between Your Router, Your Server, and Cloudflare
This step involves configuring your home router, identifying the IPv6 address of your machine, and setting up DNS records on Cloudflare to map the domain to your IP. We’ll focus on IPv6 since most internet providers do not offer static IPv4 public addresses, making IPv4 port forwarding more complex. If you need IPv4 configuration, feel free to reach out to me for assistance, we might be able to help you!
Step 1: Identify the IPv6 Address of Your Machine
- Run the ifconfig Command: Open a terminal on your server machine and run:ifconfig
- This will display detailed network configuration information. Look for a line similar to:inet6 3b88:fr84:1:g384:393l:78b3:ca4i:xxx prefixlen 64 autoconf secured
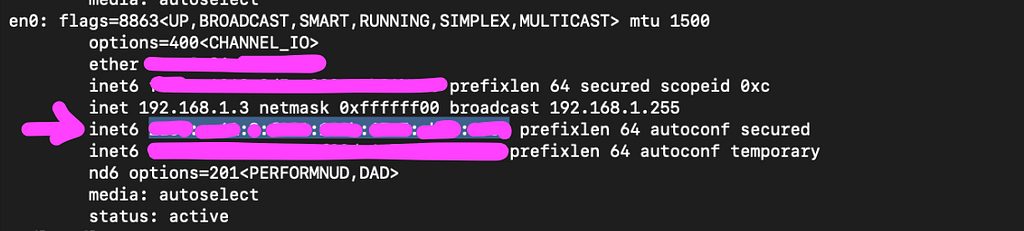
- Copy the IPv6 address (3b88:fr84:1:g384:393l:78b3:ca4i:xxx in this example) and store it somewhere secure. Avoid sharing or exposing this address publicly.
4. Access Cloudflare’s DNS Settings:
- Go to the Cloudflare Dashboard and select your domain (e.g., yourdomain.com).
- On the left menu, click DNS to access the DNS records page.
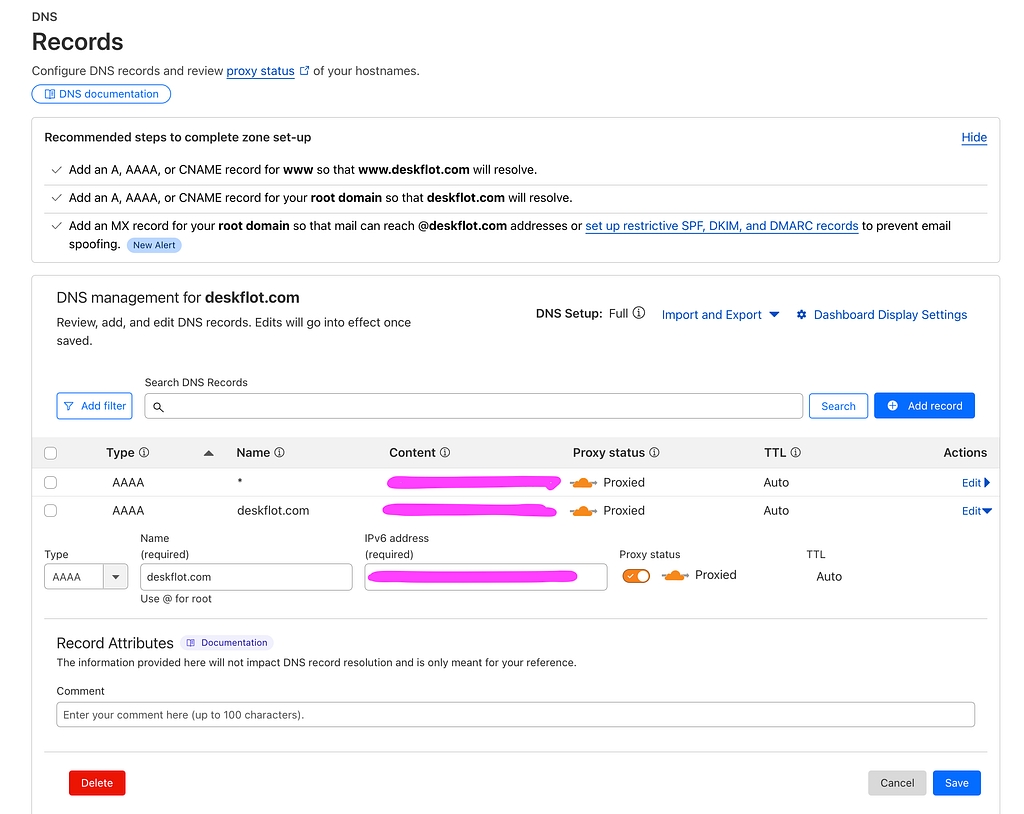
5. Modify and Add DNS Records:
- Remove existing records of type A and CNAME.
- Create three new records, as follows:
- Name: yourdomain.com (without quotes), Type: AAAA, IPv6 Address: Paste the copied IPv6 address.
- Name: www, Type: AAAA, IPv6 Address: Paste the copied IPv6 address.
- Name: *, Type: AAAA, IPv6 Address: Paste the copied IPv6 address.
That’s it for Cloudflare. Your domain is now mapped to your machine’s IPv6 address.
Step 2: Set Up Your Router Configuration
- Access Your Router’s Configuration:
- Identify your router’s IPv4 address. On a Mac, hold the Option key and click the network icon in the menu bar. This will show more detailed network information, including your router’s IP address (e.g., 192.168.1.1).
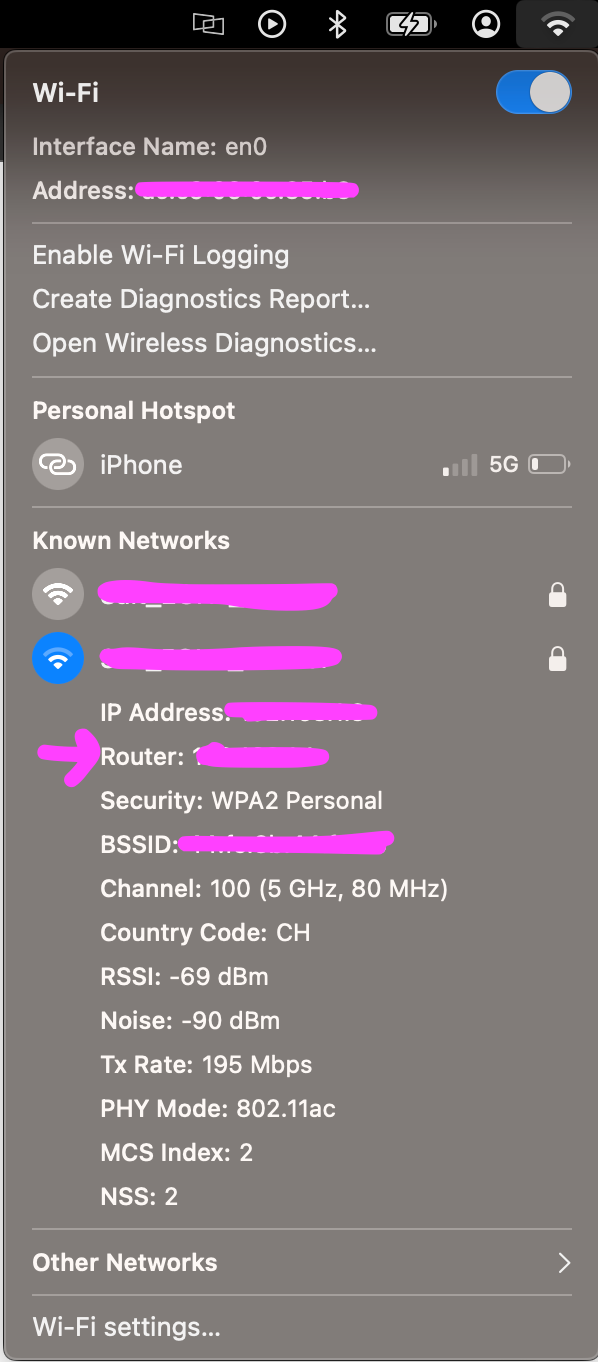
- Open a browser, type the router’s IP address into the URL bar, and log in using the admin credentials. If you don’t know them, contact your internet provider.
2. Enable IPv6 Settings:
- Once logged in, navigate to: Expert Mode → Network → IPv6 → Firewall.
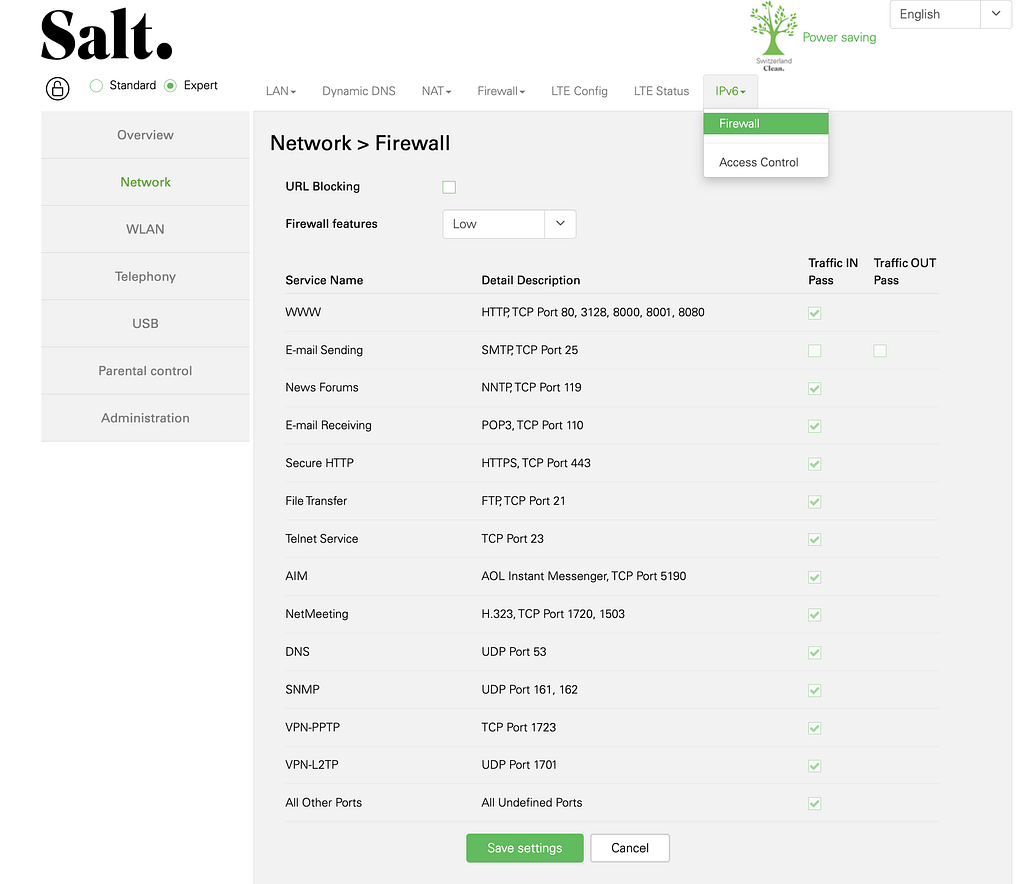
- Enable settings for WWW, Secure HTTP, and other related services.
3. Apply and Save Changes:
- Save the configuration and wait for the router to finish updating.
- Ensure your router is now tunneling traffic properly using the IPv6 configuration.
Your machine is now set up to tunnel traffic to Cloudflare’s DNS records. With this configuration, all HTTP and HTTPS requests to your domain will route securely through Cloudflare to your home server. Be cautious when modifying firewall settings and keep your IPv6 address secure.
4. Final Step: Run Your Server and Your Local App
Set Up Terminal Instances
If your code editor has an integrated terminal, you can manage everything more efficiently. You’ll need two terminal windows:
- Run the Main Server
- Navigate to your project’s root folder in the first terminal.
- Run the following command to start the reverse proxy server:
- node server.js

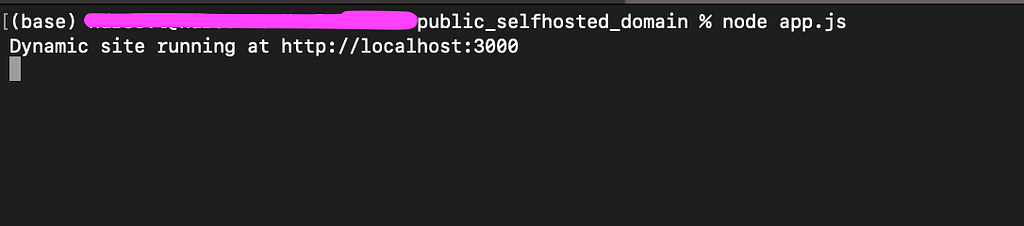
2. Run the Self-Hosted App
- In the second terminal, also navigate to your project’s root folder.
- Start your self-hosted application by running:
- node public_selfhosted_domain/app.js
Access Your Domain
- Open a browser and type your domain in the URL bar as:
- https://yourdomain.com
- https://www.yourdomain.com
- Or simply yourdomain.com.
- You should now see your application running in the browser.
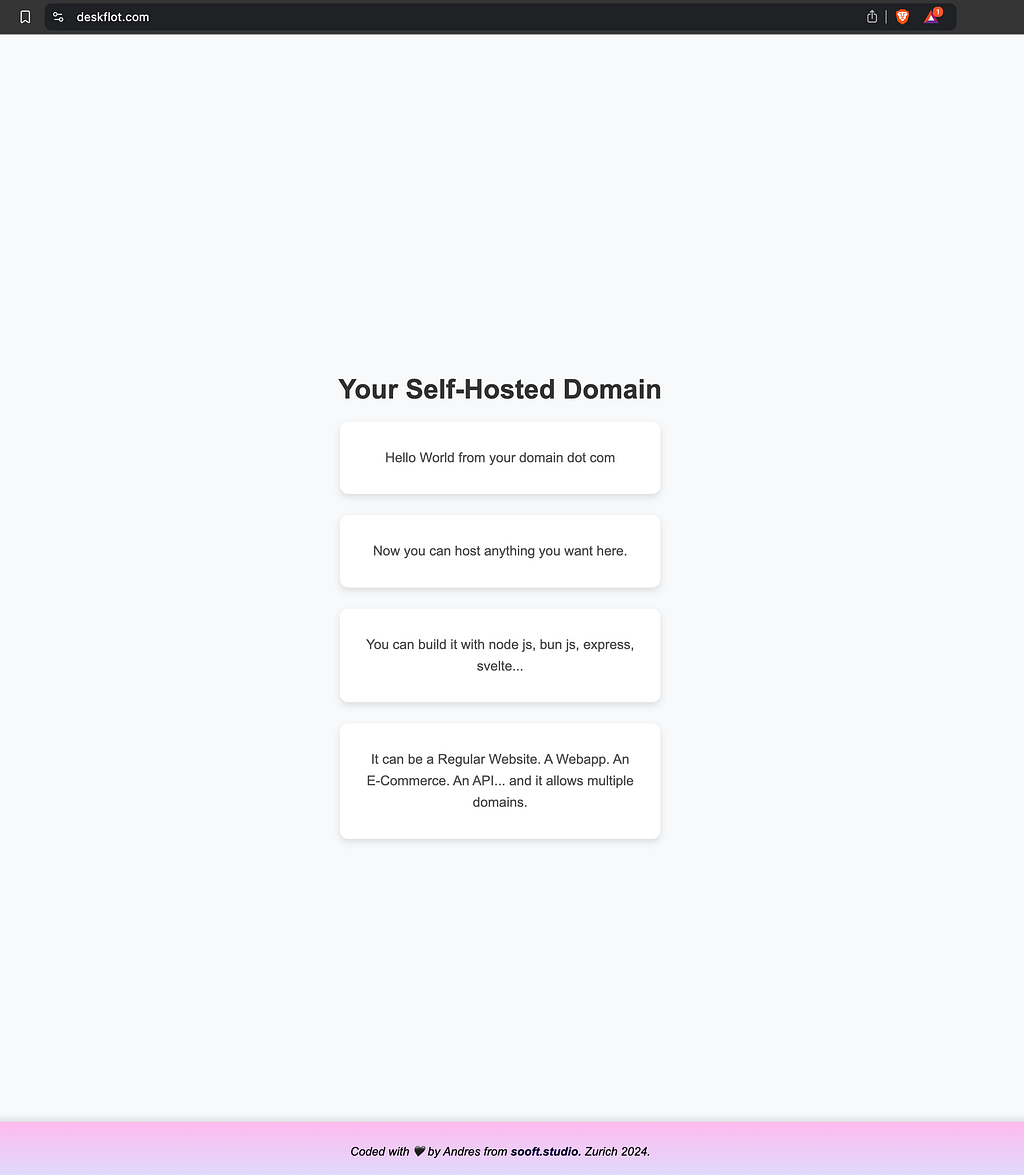
Proof of Concept: Test Your Configuration
Here are some Tests to confirm that everything is working as expected:
- Observe Terminal Logs:
- Check both terminal windows (one running the server and the other running the self-hosted app).
- Note how the logs change whenever you access your domain in the browser.
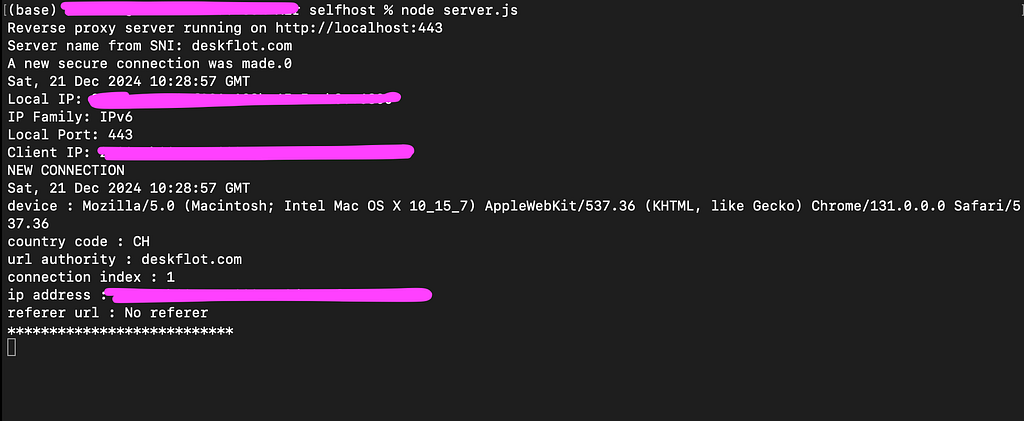
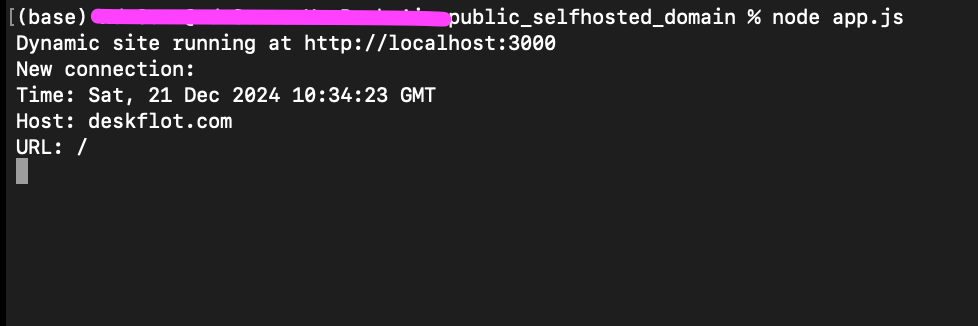
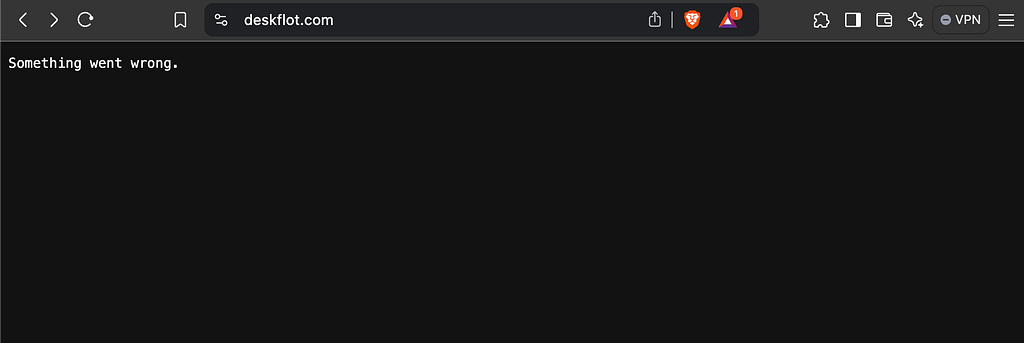
2. Stop the Self-Hosted App:
- In the second terminal, stop the self-hosted app (public_selfhosted_domain/app.js).
- Refresh the browser and observe what happens. This will demonstrate the server’s behavior when a specific app is unavailable.
3. Stop the Main Server:
- In the first terminal, stop the main reverse proxy server (server.js).
- Attempt to access your domain again. Observe how the browser behaves when the server is down.
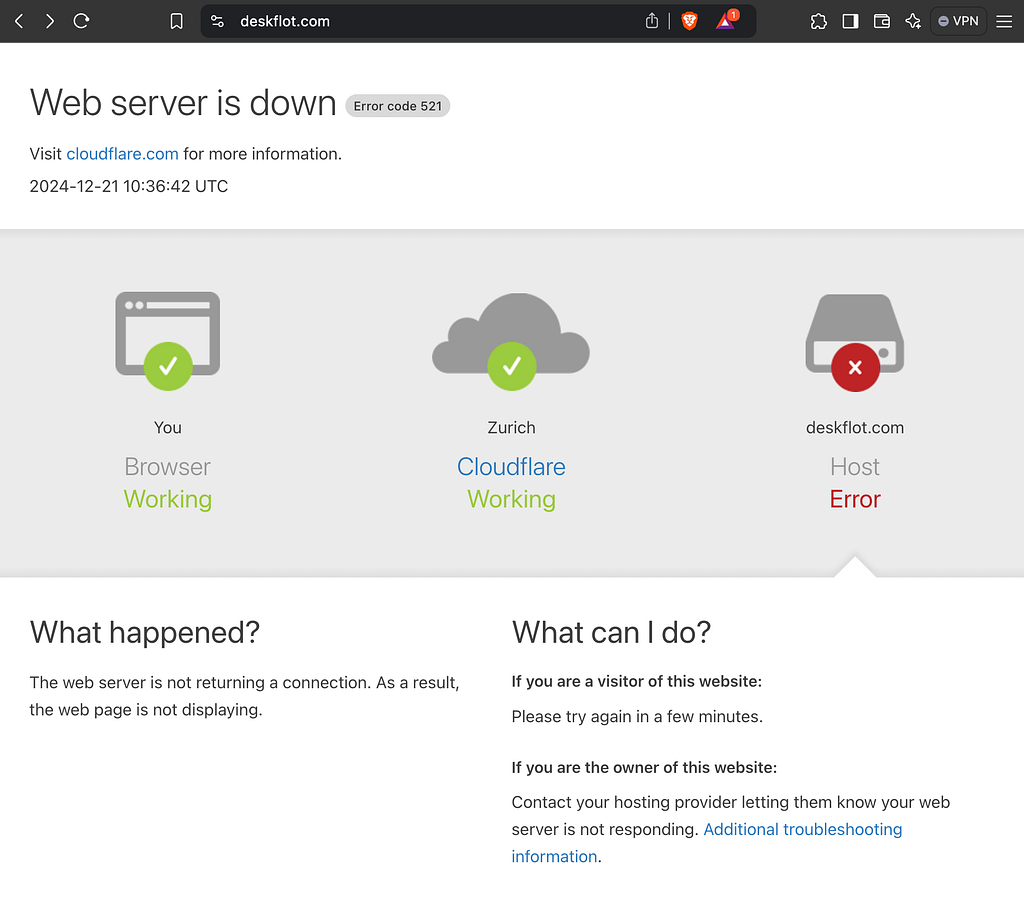
4. Reactivate the Server and the Public Application but Remove the Certificate
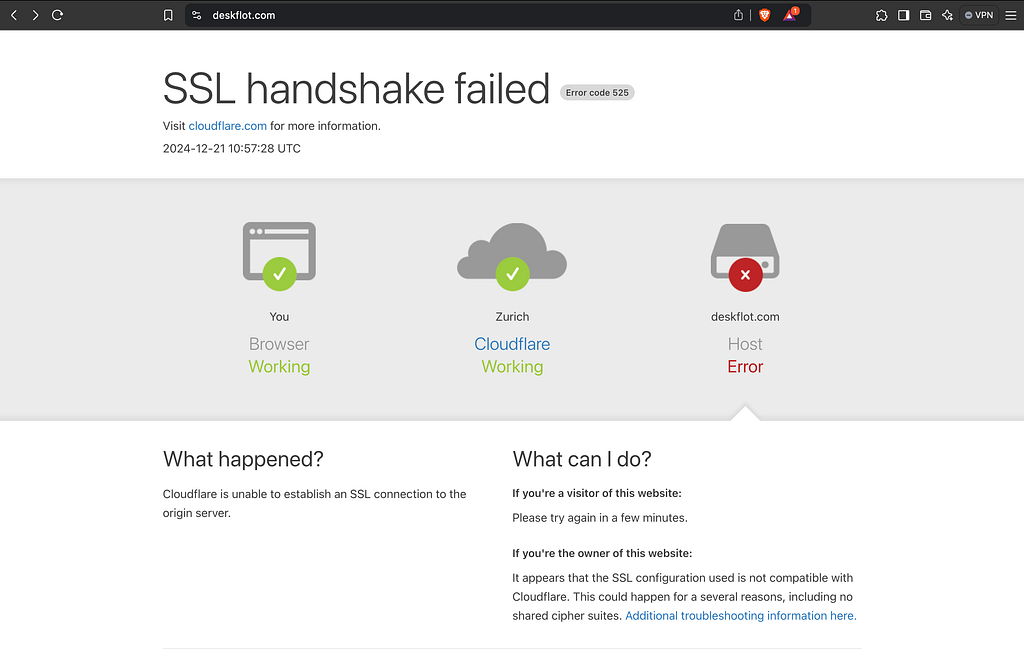
Here we want to test if the SSL Encryption plays a role at all. For that we rename our certificate to make it unmatch the name on our server.js
This will cause an SSL handshake error. Beware this might take a while to pop. You can expect the loading wheel of the browser to linger for a while before seeing this error.
5. Test that Always Use HTTPS Configuration:
On the browser type http://yourdomaincom.com (replace with your domain name, but use http
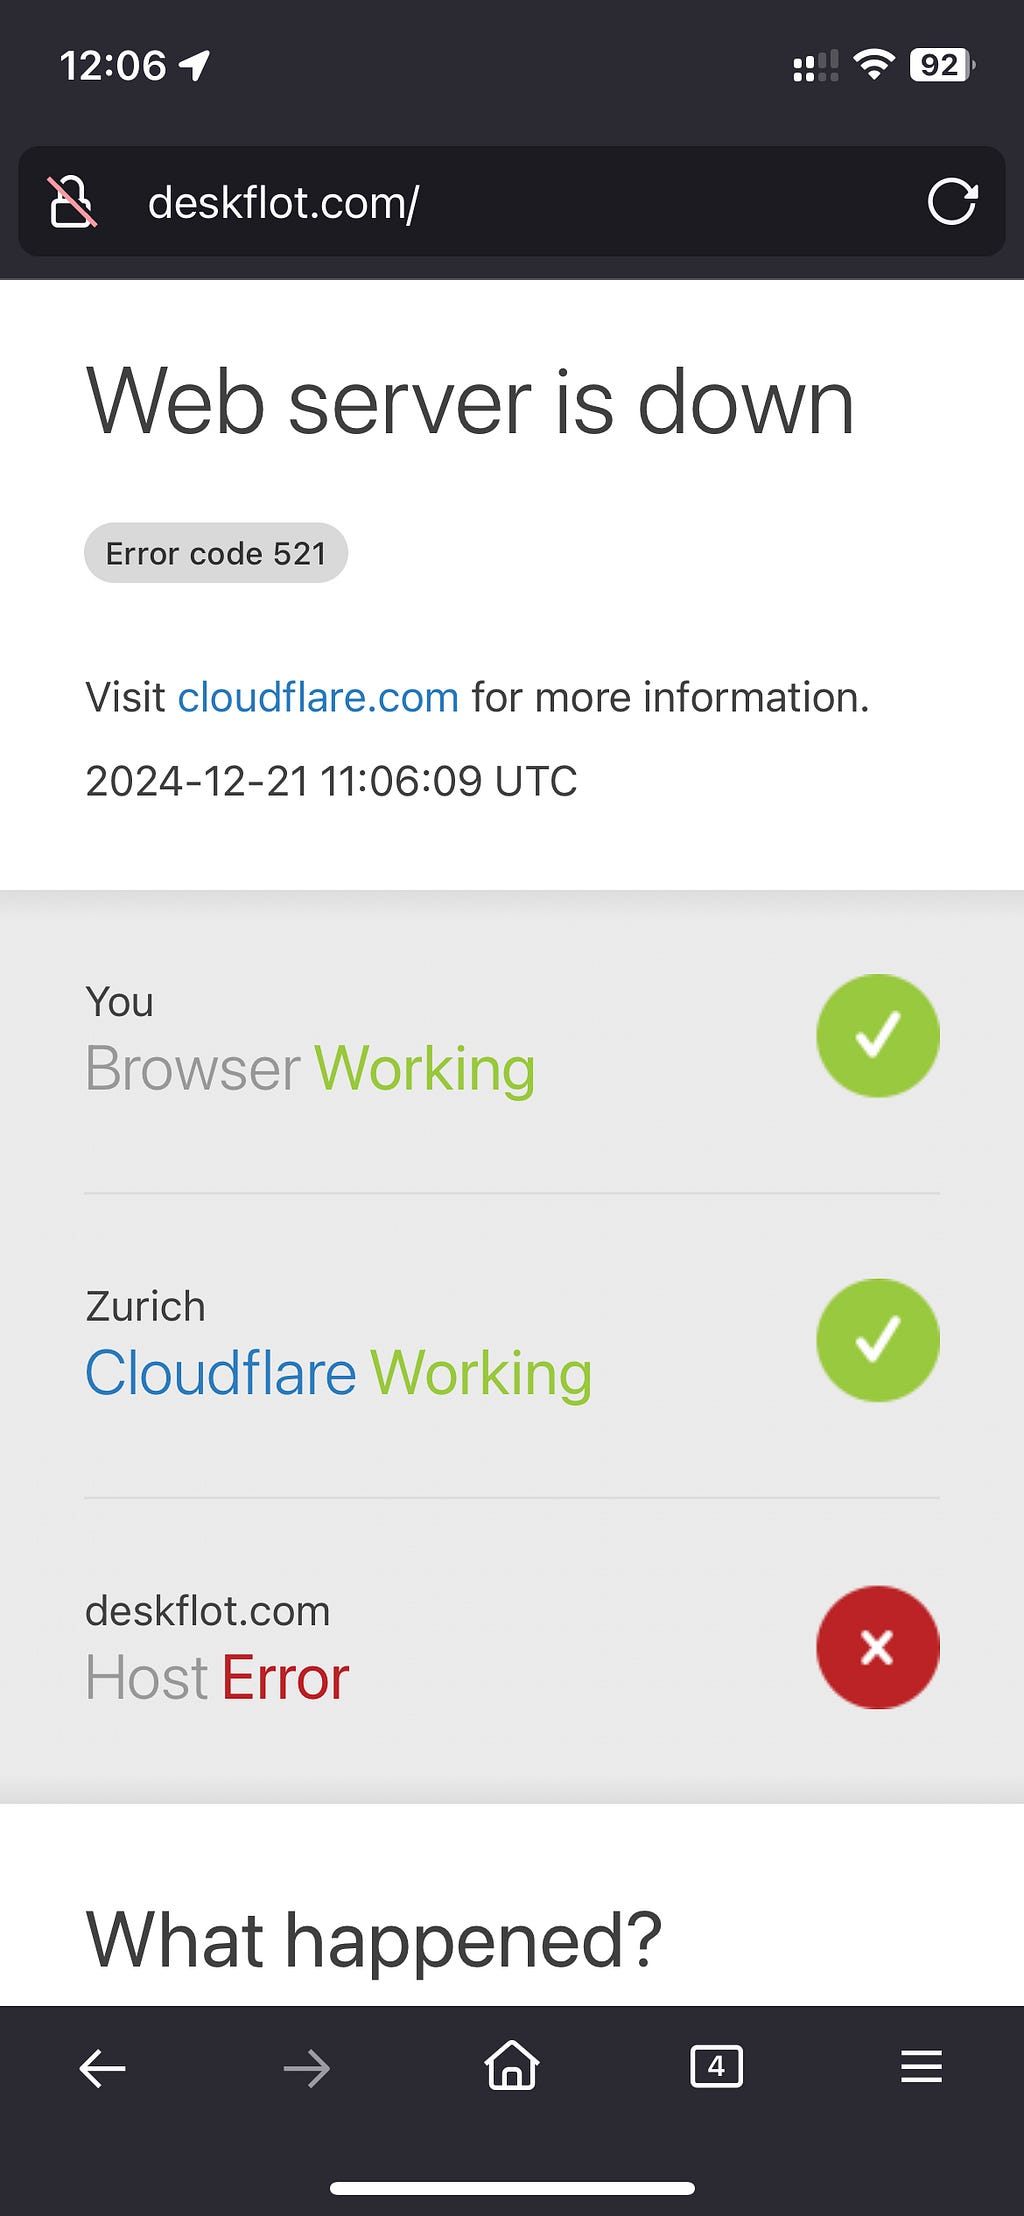
This should redirect seamlessly to the correct secure connection and the URL in the browser should beging with https. If this is not correctly configured you will see a Host Down error.
You might want to test deactivating this option, however be aware that these type of changes often get cached on the devices and browsers, and take time to propagate on Cloudflare. Hence, if you want to test this give some time for the changes to take effect and reattempt access on an incognito browser session. I could only test the error successfully on my mobile.
6. Test on Mobile Devices:
- Open your domain on a mobile device (connected to a different network, if possible).
- This ensures that you’re not just accessing an internal version of your domain but the actual externally hosted version.
Recap
With this setup, you’ve successfully created a self-hosted reverse proxy server. It is capable of serving multiple applications mapped to multiple domains, using our Node.js reverse proxy server as a broker and SSL verification node. This setup ensures secure traffic routing between the client and the respective applications while providing flexibility to host various projects under different domains.
You also have now some Test Cases, which you can go through in order to check that everything works, and to get a better grip of how this system works.
Conclusion
Using a Node.js reverse proxy server to manage traffic and SSL verification across multiple domains is less common compared to widely used tools like Nginx or Apache, which are specifically designed for this purpose and come with built-in support for reverse proxying, load balancing, and SSL/TLS handling.
However, I hope you find this solution as compelling as I do. Personally, implementing this with Node.js feels liberating. It offers me the flexibility to embed custom business logic directly into the proxy server, like dynamic routing, advanced logging, or even collecting data for traffic analytics. Unlike Nginx, which often hides behind layers of third-party applications and admin UIs designed for IT administrators, Node.js as a proxy server keeps things simple and coder-friendly. For me, that means fewer face-melting moments and more creative control.
It also keeps me with a single language stack. If my applications are written already in JavaScript, using Node.js as a server simplifies the stack, removing the need to configure and manage additional server software like Nginx.
For developers already working within the Node.js ecosystem, using something like http-proxy can eliminate the need to learn a new tool or deploy heavier web servers.
I hope that this contributes to proof that Node.js is great for quickly spinning up a reverse proxy server in development environments or for low-scale applications before moving to more robust setups like Nginx or Kubernetes ingress controllers.
Next Steps?
- I’ll rewrite this with Bun.js, for thus with FOMO by the promise of Bun’s performance benchmarks compared to Node.js.
- Another improvement could be creating a version that runs headlessly in the background, eliminating the need for an active terminal session.
- Make a video tutorial as the todo list in this guide is long, and I’m afraid people would get lost without managing to get this running.
- Serve applications written in other languages like python/flask/django or even laravel/php … let’s see how possible is this?
- Serve other types of applications beyond websites like WebSockets, APIs or Database Server
- Make an out of the box solution for testing environments and staging versions directly from your machine: say goodbye to ngrok
Great, thanks for reading through. Feel free to like this and share this with your friends or community of startups, makers, engineers and the like. Also feel free to reach out if you get in trouble running this. I’d be happy to help. And if you liked the project also give the repository a Star :)
Follow me, follow Sooft Studio, like this article and share it! It means a lot to us, and helps us to stay motivated to write more articles like this and share the code.
Editor note
I wrote this walkthrough as a very thorough long draft. After that I went through each part with the help of Claude and ChatGPT to edit it into an easier-to-follow format. You can rest assured that the content here has been generated by human-intelligence :). I hope the result comes across as a readable and compact guide that helps you to realise your projects.
References
- Setup Rasperry Pi : https://www.raspberrypi.com/documentation/computers/getting-started.html
- Repository with this project: https://github.com/ndr3svt/selfhosting_server
- About nameservers: https://developers.cloudflare.com/dns/nameservers/
- About cloudflare and DNS records: https://www.cloudflare.com/en-gb/learning/dns/dns-records/
- About proxy servers : https://en.wikipedia.org/wiki/Proxy_server
- A good reading about the future of the Internet -> Tarnoff, Benn. Internet for the People. The Fight for Our Digital Future. Verso Books. https://www.versobooks.com/en-gb/products/2674-internet-for-the-people
Originally published on Medium.